General guidelines
One of the factor that have infl uence on reliable work of bearing and its life is properly conducted mounting process. Few basic rules should be obeyed, especially:
- keeping the mounting process absolutely clean,
- protection of all parts (bearings especially)from contamination and corrosion,
- determining order of mounting activities to eliminate mistake possibility,
- using proper tools and shop devices,
- checking correctness of bearing work in motion.
Before starting the mounting process bearing seats and abutments should be checked, possible damages should be removed from seat surfaces and if it is necessary cleaned with "Anticor" kerosene. In general brand new bearings should not be washed but in case of used bearing they may be cleaned also with "Anticor kerosene. Before bearings mounting the seats and abutments should be slightly lubricated with oil or grease in order to make the assembly process easy and protect surfaces from corrosion.
Mounting bearings with cylindrical bore
Small bearings with bore diameter up to 60 mm may be cold pressed onto the shaft using press using special assembly sleeves. Bearings can be mounted on shaft using hammer, gently and uniformly (in order not to damage bearing and provide uniform distribution on the whole circumference) hitting the bearing through special sleeve made from soft alloy (Fig. 38 a, b)


In case of simultaneous pressing bearing on shaft and in the housing special washer plate should be use to uniformly distribute force (on both rings) and avoid bearing damage or skew. It is very important in case of self-aligning ball bearings and spherical roller bearings mounting. In case of self-aligning ball bearings in which balls are protrude over the bearing faces the washer plate must have undercut (Fig. 38 d). It is forbidden to apply force on ring through the rolling elements (Fig. 39)
Mounting of medium and large size bearings is difficult and especially with close fits it is extremely difficult due to high pressing force needed. Due to this reason bearing heating is utilized which makes bearing mounting easier and eliminates possibility of damages. For bearing heating mineral oil is recommen- ded. It is enough for bearings mounted on shaft with slight close fit to heat them up to 60÷70°C in a tank specially prepared to such operations (Fig. 40).
In case of severe close fits bearings can be heated to 100°C. During heating process the temperature should be carefully controlled. It must not exceed 120°C because there might occur danger of change in material internal structure and also bearing’s dimensions change. Also special electric heaters with thermostat controlled temperatures can be used for rings heating. In special cases bearing rings can be heated on a heating plate. It has to be bare in mind to reverse the bearing sides many times in order to obtain uniform heat distribution.
Bearing inner rings after mounting on seats should be pressed tight against shaft shoul- der by assembly sleeve. Greased and sealed bearings must not be heated before assembly because it could lead to grease quality de- terioration. In case of very close fit of outer ring the housing also may be heated up to 60 ÷ 70°C if its design allows for such action. During separable cylindrical roller bearings mounting the inner ring should be carefully placed on a shaft by helical movement till contact with outer ring and rolling elements (Fig. 41) in order not do damage raceways


or rolling elements. The similar proceedings should be conducted during cylindrical roller bearing mounting when inner ring with rolling elements is seated on shaft and outer ring is in the housing abutment. After mounting it is obligatory to check radial clearance. It is especially applicable to cylindrical and spherical roller bearing which are general mounted with closer fit than ball bearings. Radial clearance in cylindrical and spherical roller bearing is checked using feeler.
Assembly clearance in radial ball bearings and small cylindrical roller bearings is checked using gap gauge. In case that the clearance check is impossible, the checks can be limited to assessment of ease of revolution; bearing should rotate uniformly without any rags or seizures. Same rules applies to mounting of angular contact ball bearings and tapered roller bearings. However it should be emphasized to use proper mounting sleeves.
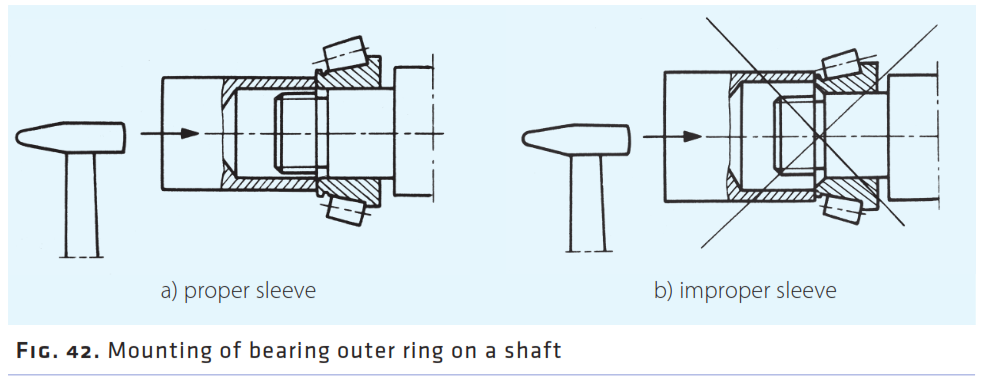
Procedures of bearing rings mounting using sleeve are shown on Fig. 42 and 43.

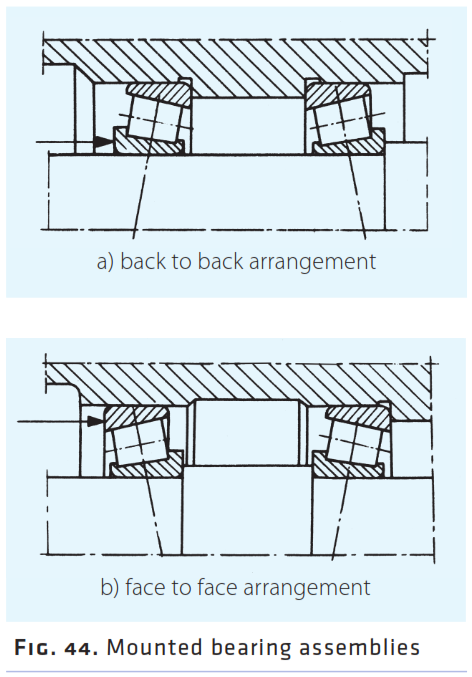
One of the condition to provide proper ope- ration of tapered roller bearings and angular contact ball bearings is keeping proper axial and resultant radial clearance. Those bearings usually work in pairs in back to back or face to face arrangements (Fig. 44) and its proper mounting have influence on axial clearance of bearing pair.
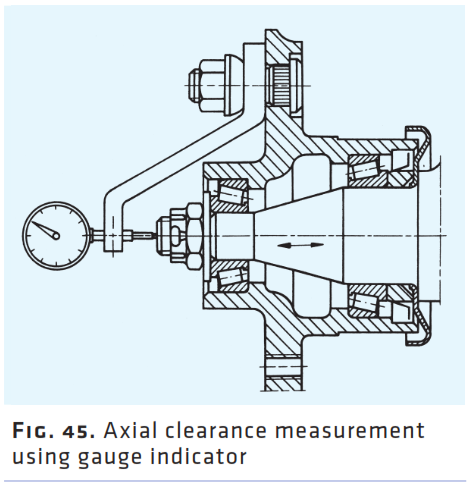
Clearance value of pair of angular contact bearings should be close to zero or even they should have slight preliminary preload – depending on operating conditions. Severe load and great speeds of revolution causes bearings mounting places to heat. Clearance set during mounting may change during bearing work due to thermal expansion. Whether clearance is going to get bigger or smaller depends on: bearings sizes and arrangement, heat transfer manner and from bearings distance. Reliable indicator of proper clearance in correctly mounted bearings is its temperature which in operating conditions should be more or less constant. In case of bigger sizes bearings or when very accurate bearing solution is needed e.g. for machining centres spindles the axial clearance should be checked using gauge indicator (Fig. 45).
When measuring axial clearance of tapered roller bearings few movements of shaft or housing should be made before measure- ment in order to allow rolling elements to correctly position themselves with relation to guiding flange. Regardless of that, special attention such be paid on bearing movement which should be uniform without any rags or seizures at undetectable axial clearance. Very important issue is clearance regulation in angular contact bearings because to big clearance may lead to premature bearing wear and to small can often cause bearing failure. Mounting of thrust bearings do not cause any serious problems because theirs rings are usually with less close fit than in other bearings. Nonetheless in this groups of bearings issue of setting proper value of assembly clearance causes problem, especially in case of unidirectional thrust ball bearings used in horizontal bearing solutions.
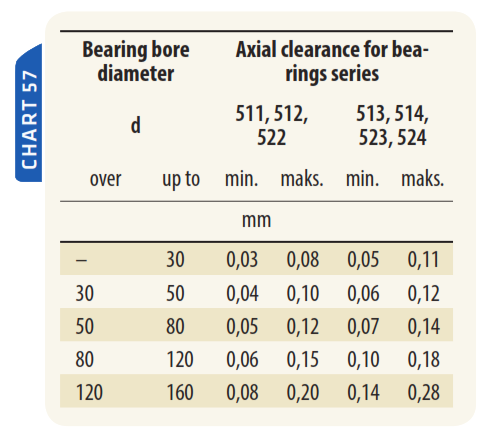
In most cases clearance after assembly is set "by sight" (as shown in Fig. 46), but in bearing solutions where axial clearance have great infl uence on working accuracy a bearings after mounting should be checked using gauge indicator. Rough values of clearances after assembly for thrust bearings are presented in Chart 57.

Mounting of bearings with tapered bore
Bearings with tapered bore usually need very tight set-back which is achieved by pressing inner ring onto taper shaped shaft (Fig. 47) or using withdrawal sleeve (Fig. 48) alternatively pressed sleeve (Fig. 49).


Mounting of bearings with tapered bore requi- res some experience in this area. Amount of interference is not specified by shaft tolerance as in case of bearings with cylindrical bore but by smaller or bigger insertion of bearing onto taper seat or sleeve. In the event of to great insertion of inner ring clearance may totally disappear which would lead to bea- ring scoring during work. On the other hand fit should be tight in order not to allow for bearing movement on shaft seat or tapered sleeve. Indicator of proper bearing mount with appropriate interference is decrees of its clearance by specified value.
In self aligning ball bearings and small spherical roller bearings measurement of clearance using feeler is very difficult and sometimes impossible. In such case clearance measurement is performed in indirect way by observing possibility of rings inclination and supervising whether bearing still can rotate without noticeable rags or seizures. Bearing mounted according to this guidelines guarantee proper clearance and as a result reliable work. In case of spherical roller bearing with taper bore mounting radial clearance should be assessed using feeler, then bearing should be placed on seat and firmly pressed simultaneously moving axially its inner ring with regard to seat by value provided in Chart 58.
Axial displacement should be measured from position in which bearing taper adjoin firmly on a whole surface to the shaft taper without considerable force acting. Then bearing clearance should be checked. If the new clearance value obtained in measurement is within allowable limits acc. to Chart 58 it means that the bearing has been properly mounted. In case when some non-conformity with guidelines from the chart occurred the inner ring should be moved away from the shaft and measurement should be repeated. It has to be noticed that before measurements performing a few rotations of shaft should be made in order to let rollers to position themselves. Clearance measurement using feeler should be made between outer ring and non-loaded roller.

Obtained results should be alike for both rows of rollers. Chart 58 shows radial clearance reduction values and axial displacements in case of spherical roller thrust bearings with tapered bore moun ting Adherence to this guidelines assure achieving proper fit, especially in case of maximally reduced radial clearance. Large bearing loads, high revolution speeds or big temperature differences between inner and outer ring caused by external factors requires adequate enlarged clearance after mounting. In order to fulfil this C3 or C4 clearance bearings should be used and during mounting maximal allowable clearance decrement should be achieved. Analogical proceeding should be incorporated during mounting bearings on withdrawal sleeves. Bearing pressing onto taper shaft or tapered sleeve should be made using mounting sleeve, as shown on Fig. 50. Significant simplification during bearing mounting, especially in case of bigger sizes bearing can be achieved by using hydraulic assembly method. This type of mounting requires particular adaptation of seats and potentially withdrawal sleeves with hydraulic nut (Fig. 51) as well as using special high pressure oil pumps.


Procedure of hydraulic mounting is shown on drawings 52 ÷ 55. This procedure is based on high pressure oil feed into the hydraulic nut and causing pressure acting on pressed ring or on surfaces between bearing bore and shaft seat which causes material to ease within elasticity limit. After mounting bearings should be lubricated and should undergo rotation test which would assess running uniformity and check bearing or grease temperature. This test should be conducted till temperature stabilization on constant level. Running uniformity may be assessed for example using screwdriver which is pressed against the housing and listening to sounds that bearing make during rotation. Bearing should emit uniform sound similar to suppressed growl. In the event of non normal temperature occurrence and further tendency to its growth or when observing improper noises the running test should be stopped and abnormalities carefully analysed.


Bearings dismounting
Before starting the dismounting process the proceeding order should be elaborated, if this is possible basing on bearing assembly drawing. Special attention should be put on such design details as: set-back values of seats and abutments, holes, grooves etc. that allow use of standard tools used for demounting. In case of non-separable bearings which will be used again it is forbidden to demount them using force acting on rolling elements due to possibility of causing indentations on raceway. Small sizes bearing can be demoun- ted using special pin punch placed around demounted ring.
Bearing dismounting is easier if designer of the machinery considered such solutions which allows using force needed for withdrawal. This could be for example: nicks on shaft or housing for puller placement or threaded holes for pushbolts.
Typical design details of pullers and pus- hbolts are presented on Fig. 56 ÷ 58, where basic examples of bearing dismounting on Fig. 59 ÷ 61.


Dismounting bearing with very close fit, especially those with bigger sizes needs in- corporation of special pullers. For dismounting of inner rings of cylindrical roller bearings electrically heated pullers are used thanks to which ring is heated fast (before the shaft temperature increases) and can be easily demounted from shaft. There are also utilized very simple pullers for heating (Fig. 62) Such puller (ring) made from light alloy with such outer diameter as demounted ring is heated using heating plate or induction coil or simply using flame.

After heating to 200÷250°C tool is placed onto dismounted ring which should be lubricated before with oil in order to provide better thermal conductivity. This allows for bearing dismounting with relatively low force. Great problems during dismounting may cause bigger sizes spherical roller bearings, with cylindrical bore. Due to this reason this type of bearing is mostly used with tapered bore which allows for placement directly on shaft seat or using withdrawal sleeves that make dismounting easier.
Bearings mounted using withdrawal sleeve should be dismounted using special segmen- ted pin punch and slight hammer hits, after previous nut unscrew from sleeve. Proceeding with dismounting of bearing mounted on pressed sleeve – as first bearing nut should be undone then dismounting nut should be screwed to threaded part which is used for sleeve retraction.


